This is a meta-post about some updates I have been developing for the website. I decided to reorganize some of the content and provide information in a way that is easier to navigate.
To provide bit-sized information in chronological order I decided to use a timeline layout, and I developed my own Jekyll plugin to create animated responsive timelines in pure CSS. This post shares a little background and some key insights.
Background
I started thinking about how to put together a timeline layout. Not reinventing the wheel is usually a good principle to live by, so I checked if I could find any pre-existing solutions that would fit my use case. A quick search for Jekyll plugins however did not find any interesting plug-and-play solution.
However, I had at least some clear inspiration for what I wanted to achieve. Thinking about timelines brought back to my mind a nice layout I saw a few years ago on Lisa Schwetlick’s website (and that has probably been a latent inspiration for this whole idea).
So I had a look at her site, and her solution seems to be at least partially based on CodyHouse’s timeline component.1 The CodyHouse components is distributed under a free license that in principle would be compatible with my website, but I considered some arguments for not using it:
- The CodyHouse license prevents from distributing derivative work in plugin form (which is an option I want to keep on the table).
- It depends on the CodyHouse framework, and I would prefer to avoid introducing external dependencies, especially on content that is freemium or not under fully free licenses.2
- Maybe it is time to learn some new web development tricks and have some fun while at it.
For that reason, I decided to roll out my own solution in a reusable manner.
Key concepts
The first step is to organize the layout for the content. Thankfully, these days it is much easier to accomplish it with pure CSS.
Each event in the timeline should be rendered as a tile, and the basic layout is structured with a vertical flexbox for the events, where each event is itself a horizontal flexbox containing a marker on the vertical line and a box with text. Jonas Hietala has a nice tutorial explaining some basic ideas and a few neat tricks that I decided to adopt and adapt. I recommend reading it to get all the details.
The vertical line in the timeline is drawn with the ::before
pseudo-element of
the element containing the timeline events.
.tl-events::before {
    content: "";
    position: absolute;
    top: 0;
    height: 100%;
    width: 1px;
}
Events are placed alternating left
and right of the vertical line using the :nth-child()
pseudo-class,
setting mirrored properties for elements on each side
.tl-event:nth-child(odd) {
    .tl-event-content {
        padding-right: 2em;
    }

    .tl-event-content .tl-event-content-box {
        padding-right: 0.5em;
    }
}

.tl-event:nth-child(even) {
    flex-direction: row-reverse;

    .tl-event-content {
        text-align: left;
        padding-left: 2em;
    }

    .tl-event-content .tl-event-content-box {
        padding-left: 0.5em;
    }

    .tl-marker {
        left: calc(var(--marker-size) * 0.5);
    }
}
Like in my inspiring examples, I wanted to support multiple categories for timeline events, and correspondingly use different but matching colours and icons, and also add a filter to interactively select what categories to show or hide. A row of filter buttons are rendered on the top of the timeline, and clicking them allows to hide/show events belonging to the corresponding category.
This is accomplished in pure CSS using the checkbox
hack,
where the control buttons are labels of a hidden checkbox, therefore clicking
them toggles the state of the checkbox, which in turn can be used to control
the style of other elements using the :checked
pseudo-class.
#tl-check:checked ~ .tl-events > .tl-event {
  opacity: 0;
  height: 0;
}
The row of filter buttons is a horizontal flexbox. These controls need to be
visible while scrolling, so the element is kept at the top of the page with
position: sticky:
.tl-filters {
    position: sticky;
    z-index: 1000;
    display: flex;
    flex-direction: row;
    width: 100%;
    align-items: center;
    justify-content: center;
}
Animations are defined in CSS, and the new transition-behavior
property
can be set to allow-discrete to animate appearance and disappearance of
elements in pure CSS.
.tl-event {
    transition-property: height, opacity;
    transition-duration: 0.5s;
    transition-behavior: allow-discrete;
}
Jekyll plugin
To wrap everything together, a couple Liquid tag blocks generate the underlying HTML and that part of the CSS that depends on user content (since each event category has its own styling, and the number and style of event categories can be freely defined by the user, the related CSS needs to be generated at build time).
An outer {% timeline %} tag block defines the timeline
and specifies the configuration (such as what event categories to use and their
styling). The configuration is provided as a chunk of YAML passed as argument
to the opening tag. {% event %} tag blocks placed inside
it allow to define individual events.
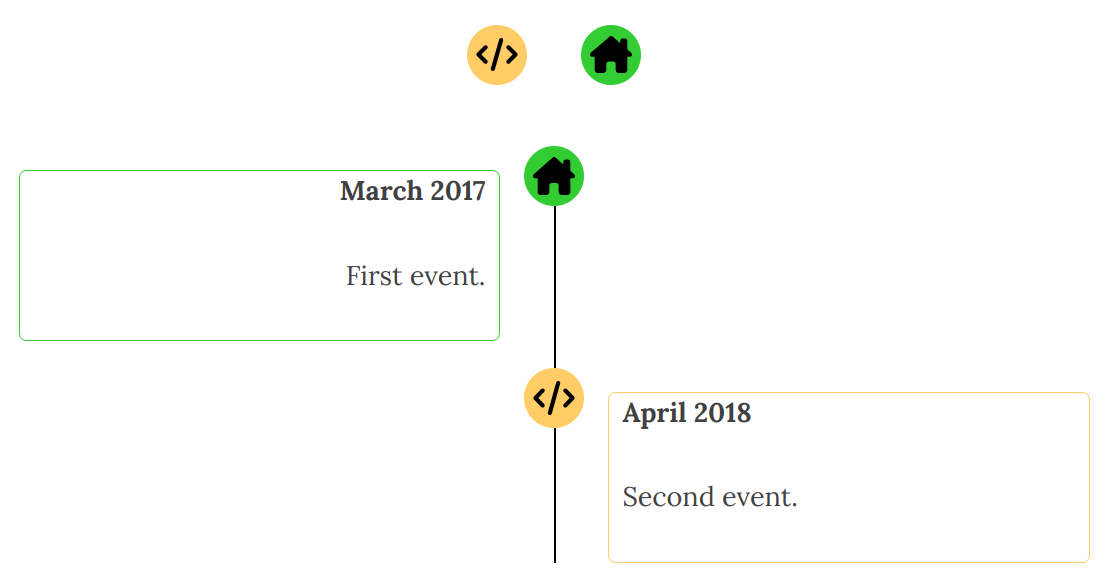
For instance, the following code
{% timeline
id: example-timeline
categories:
    project:
        color: "#FFCC66"
        icon: /img/fontawesome/code.svg
    life:
        color: "#33CC33"
        icon: /img/fontawesome/house-chimney.svg
%}

{% event life, March 2017 %}
First event.
{% endevent %}

{% event project, April 2018 %}
Second event.
{% endevent %}

{% endtimeline %}
will produce this result:
Conclusion
There is definitely room for improvements. Animations could be made nicer, e.g. by having the elements flow more smoothly when an item is shown or hidden. Also, the placement to the left or right of the line could be dynamically altered based on what elements are being shown or hidden (while currently it is statically determined based on the order of elements, including both visible and hidden). Dynamically loading events with infinite scroll could also be a nice improvements for longer timelines.
These should be relatively easy to achieve by adding a bit of Javascript to the mix, but for now I have given more weight to the simplicity of a pure CSS solution. It is interesting to observe how much more powerful and versatile CSS has become in the years.
The source code of this timeline plugin for Jekyll is available on GitHub. Enjoy!